
Turning an ordinary cut of beef into a restaurant-quality dish is magical. My journey with reverse sear beef tenderloin started on a crisp autumn evening. I wanted to make something special for my family dinner.
Meat preparation techniques have changed, and the reverse sear method is a game-changer. It ensures an evenly cooked interior and a rich, beautiful crust. Your taste buds will thank you.
Imagine serving a beef tenderloin that looks like it’s from a high-end steakhouse. With a few simple steps, you can get professional results at home. The reverse sear method makes cooking easy and ensures a delicious meal every time.
In this guide, we’ll show you how to make a mouthwatering beef tenderloin. It will impress even the most picky food lovers. Get ready to improve your cooking and make a dinner that will be remembered.
Understanding the Art of Reverse Searing
Reverse searing is a cooking technique that changes how you cook beef tenderloin. It uses low heat to cook the meat evenly before searing it with high heat. This method is different from traditional ways of cooking.

What Makes Reverse Searing Different
Traditional cooking can lead to uneven temperatures and overcooked meat. Reverse searing fixes this by controlling the cooking process. Here’s why it’s special:
- Precise temperature control
- Consistent internal cooking
- Superior exterior crust development
Benefits of the Two-Step Cooking Process
The two-step method of reverse searing has big advantages for beef tenderloin:
- Low and slow cooking ensures uniform temperature throughout the meat
- High-heat searing creates a delectable, crispy exterior
- Reduces the risk of overcooking
Science Behind Perfect Doneness
Knowing the science behind cooking can improve your skills. Starting with low heat, you slowly cook the meat to the right temperature. Then, high heat searing creates a flavorful crust through the Maillard reaction.
| Cooking Stage | Temperature | Purpose |
|---|---|---|
| Low and Slow Cooking | 250°F | Even internal cooking |
| High-Heat Searing | 425-450°F | Crust development |
A digital meat thermometer is key for precise doneness. Aim for an internal temperature of 130°F for a perfect medium-rare beef tenderloin.
Essential Ingredients and Equipment Selection

Choosing the right beef tenderloin cuts and seasoning is key to a great meal. Look for premium cuts that promise tenderness and flavor.
For a reverse sear, consider these cuts:
- Chateaubriand: Ideal for its uniform size and exceptional quality
- Filet Mignon: Most tender section of the tenderloin
- Center-Cut Tenderloin: Provides consistent cooking results
Here’s what you need for reverse searing:
- Reliable digital meat thermometer
- Wire cooling rack
- Heavy-duty cast iron skillet
- Sharp carving knife
When picking seasonings, think about these flavors:
| Seasoning Type | Key Ingredients | Flavor Profile |
|---|---|---|
| Classic Herb | Rosemary, Thyme, Garlic | Earthy, Aromatic |
| Smoky Blend | Paprika, Black Pepper, Cumin | Bold, Intense |
| Mediterranean | Oregano, Basil, Sea Salt | Fresh, Bright |
Buy a 3-4 pound beef tenderloin for 4-6 servings. Use fresh, high-quality ingredients to improve your reverse sear.
Preparing Your Beef Tenderloin
Learning how to prepare meat is key to making a tender and juicy steak. Your beef tenderloin needs careful handling to get the best taste. A whole tenderloin weighs 4-6 pounds, so it’s a big piece that needs attention.
Trimming and Trussing Techniques
Proper preparation starts with trimming. Here’s what to do:
- Remove excess fat and silverskin carefully
- Use a sharp boning knife for precise cuts
- Trim any uneven sections to ensure uniform cooking
- Truss the tenderloin with kitchen twine to maintain shape
Proper Seasoning Methods
Seasoning is vital for flavor in your steak. For the best taste:
- Use kosher salt generously
- Apply freshly ground black pepper
- Consider dry brining for 2-4 hours
- Pat the meat completely dry before seasoning
Room Temperature Importance
Bringing your beef to room temperature is a must. Remove the tenderloin from the refrigerator 1 hour before cooking. This ensures even cooking and the perfect internal temperature.
By following these steps, you’ll prepare a spectacular beef tenderloin. It’s sure to wow your dinner guests.
The Complete Guide to Reverse Sear Beef Tenderloin
Learning how to reverse sear beef tenderloin makes it truly special. This method cooks the beef slowly, making it tender inside and crispy outside.
Start by getting your beef tenderloin ready with these steps:
- Choose a beef tenderloin between 3-4 lbs
- Ensure the meat is 1.5-2 inches thick
- Pat the surface dry with paper towels
- Season generously with salt and black pepper
For the slow cooking, follow these temperature guidelines:
| Doneness Level | Oven Temperature | Target Internal Temp | Cooking Time |
|---|---|---|---|
| Rare | 250°F | 115-120°F | 35-45 minutes |
| Medium Rare | 250°F | 120-125°F | 45-55 minutes |
| Medium | 250°F | 130-135°F | 55-65 minutes |
Once slow cooking is done, it’s time for the searing stage. Heat a 12-inch cast iron skillet to 400°F. Sear each side for 1-2 minutes. Add butter and herbs halfway for extra flavor.
Pro tip: Let your beef tenderloin rest for 15 minutes after cooking. This allows juices to spread, making it juicy and tender.
Temperature Control and Timing Guidelines
Mastering steak doneness levels needs precision and patience. The reverse sear method changes your cooking by giving you control over temperature and texture. Knowing how to control grill temperature can make your beef tenderloin amazing.
Optimal Cooking Temperatures
For reverse searing, cook low and slow. Use an oven at 225°F to 250°F for even heat. This method is best for steaks over 1.5 inches thick, ensuring even cooking.
Doneness Level Chart
| Doneness Level | Internal Temp | Cooking Time |
|---|---|---|
| Rare | 105-115°F | 20-25 minutes |
| Medium Rare | 116-125°F | 30-35 minutes |
| Medium | 126-135°F | 35-40 minutes |
| Medium Well | 136-145°F | 45-50 minutes |
| Well Done | 146-155°F | 50-55 minutes |
Resting Period Recommendations
After cooking, let your steak rest for 10-15 minutes. This step lets juices spread, making the steak tender and flavorful. Use a meat thermometer to check the temperature, as the meat will cook a bit more while resting.
- Always use a high-quality meat thermometer
- Remove steak from heat 10-15°F below desired final temperature
- Tent with foil during resting to maintain warmth
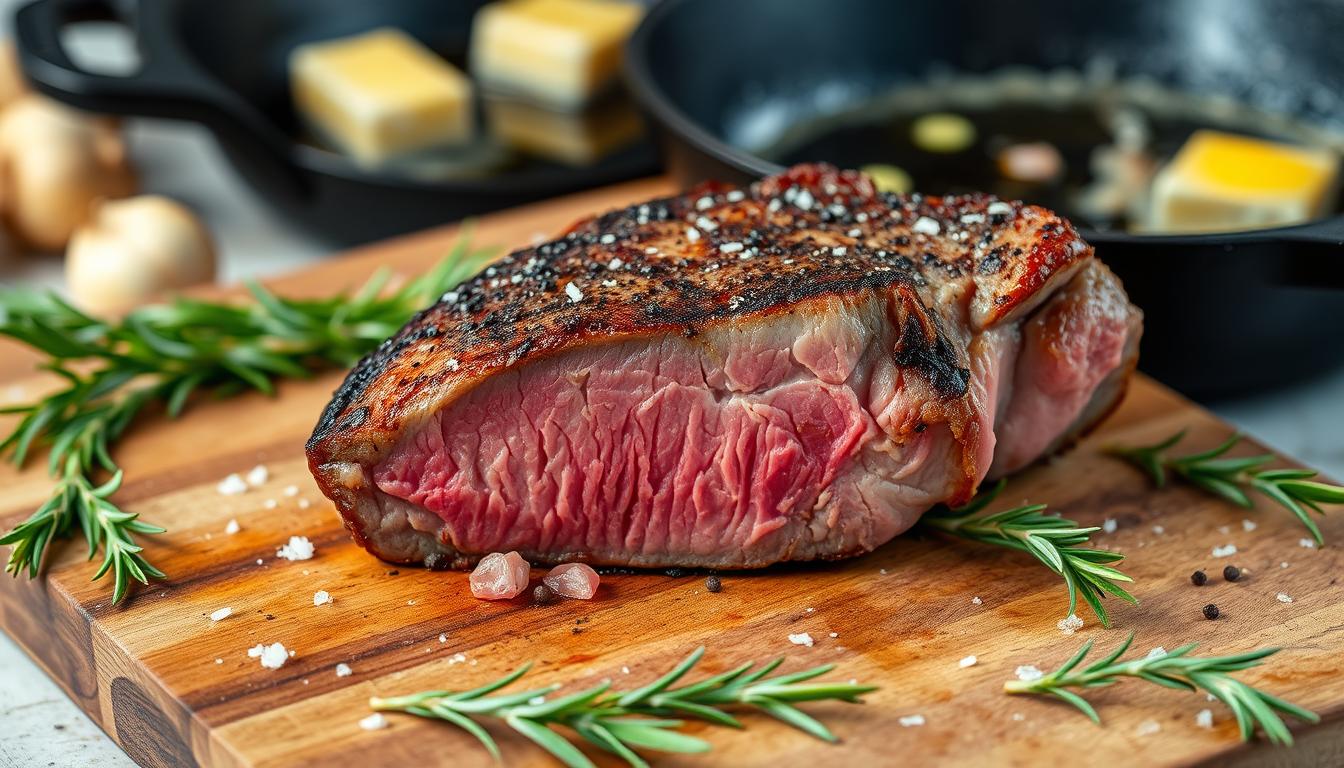
Creating the Perfect Crust
High-heat searing is the secret to making your steak go from good to amazing. The last step in cooking your beef tenderloin is to make a golden-brown crust. This crust locks in flavor and looks stunning.
- Choose a heavy-bottomed cast-iron skillet for even heat
- Make sure the pan is very hot before adding meat
- Pat the tenderloin dry to help the crust form
- Use oils like avocado or grapeseed that can handle high heat
Timing is key for the perfect crust. Here’s how to sear it right:
- Heat the skillet to 450-500°F
- Add 2 tablespoons of butter with fresh herbs
- Sear each side for 1-2 minutes
- Keep basting the meat with herbed butter
The Maillard reaction changes the meat’s surface. It creates complex flavors that make each bite delicious. You want a deep golden-brown outside and a juicy inside.
| Searing Technique | Temperature Range | Recommended Time |
|---|---|---|
| Cast Iron Skillet | 450-500°F | 1-2 minutes per side |
| Herb-Infused Butter | 375-425°F | Continuous basting |
Remember, patience and precision are key to getting that perfect crust on your beef tenderloin. Keep practicing to get it just right!
Compound Butter and Sauce Pairings
To make your steak truly special, you need more than just great cooking. The right sides can turn your beef tenderloin into a work of art. Seasoning blends for beef pair well with compound butters and rich sauces, boosting the meat’s taste.
Classic Herb Compound Butter Recipe
Make a delicious herb butter to elevate your beef tenderloin. Here’s a simple recipe with rich flavors:
- 6 tablespoons unsalted butter, softened
- 5 garlic cloves, minced
- 1 teaspoon fresh rosemary, finely chopped
- 1 teaspoon fresh thyme, chopped
- Pinch of salt and freshly ground black pepper
To make, mix all ingredients in a bowl with an electric mixer until smooth. Shape into a log on parchment paper. Chill for at least 30 minutes before serving.
Wine Sauce Variations
Pairing your beef with a rich wine sauce can make your meal unforgettable. Try these tasty options:
- Red Wine Reduction: A full-bodied red wine makes a deep, complex sauce
- Port Wine Sauce: Sweet and perfect for tender steak
- Cabernet Sauce: Highlights the beef’s rich flavors
Tip: When adding butter or sauce, do it gently to keep the steak’s crust intact. A light drizzle or small dollop can add flavor without overpowering the meat.
Common Mistakes to Avoid
Mastering meat preparation techniques is key. It involves avoiding common pitfalls in the reverse sear method. Many home cooks face challenges in achieving perfect steak doneness levels. This is due to errors that can ruin the final dish.
Here are some critical mistakes to steer clear of during your reverse sear journey:
- Incorrect temperature control: Not keeping the cooking temperature between 225-250°F can cause uneven cooking
- Skipping meat surface preparation by failing to thoroughly pat the beef dry before searing
- Using inappropriate cooking oils with low smoke points for high-heat searing
- Neglecting to monitor internal meat temperature throughout the cooking process
Temperature precision is vital for successful reverse searing. When using meat preparation techniques, remember these key guidelines:
- Use a reliable meat thermometer
- Ensure your cast iron skillet reaches 500-700°F before final searing
- Select steaks at least 1.5 inches thick for optimal results
- Track internal temperature instead of relying solely on cooking times
Understanding steak doneness levels is key to avoiding overcooking. Aim for these internal temperatures for perfect results:
- Rare: 120°F
- Medium-rare: 130°F
- Medium: 145°F
- Medium-well: 150°F
- Well done: 155°F
By avoiding these common mistakes, you’ll improve your reverse sear technique. You’ll consistently produce restaurant-quality beef tenderloin at home.
Conclusion
Learning the reverse sear technique makes your home cooking feel like a pro’s. It lets you control temperatures and follow a step-by-step method. This way, you can make a steak that’s as good as what you get at fancy restaurants.
Using the reverse sear method is more than just cooking. It’s about mastering the art of cooking with precision. Every time you try it, you get better at understanding how to prepare meat. Your filet mignon stays moist, and the outside gets a delicious crust that holds in all the flavors.
Getting good at reverse searing takes time and patience. Start with high-quality cuts like filet mignon. Make sure your steaks are 1.5 to 2 inches thick for the best results. As you get better, you’ll know exactly how to cook your steak to the perfect doneness every time.
Now that you know how to reverse sear, you can try new things in the kitchen. You’ll know how to pick the right cut and control the temperature. You can make delicious, tender steaks that will wow your family and friends. Keep trying new things, stay curious, and enjoy the journey of becoming a better cook.
FAQ
What is reverse searing and why is it better than traditional cooking methods?
Reverse searing is a two-step method. First, you cook the beef tenderloin at a low temperature in the oven. Then, you finish it with a high-heat sear. This method ensures even cooking and a perfect crust.
Unlike traditional methods, it prevents overcooking. This way, you can achieve restaurant-quality results at home.
What equipment do I need to reverse sear a beef tenderloin?
You’ll need a meat thermometer, a wire rack, a baking sheet, and a heavy-duty cast-iron skillet or grill. A probe thermometer helps during the low-temperature phase. An instant-read thermometer is key for checking doneness.
How long does the reverse sear process take?
The time varies based on the beef tenderloin’s thickness. The low-temperature phase takes 45-90 minutes at 225-250°F. The final sear takes 1-2 minutes per side.
Plan for 1-2 hours total, including resting periods. Focus on the internal meat temperature, not just time.
What are the best seasonings for beef tenderloin?
Simple seasonings like kosher salt and black pepper are often the best. For more flavor, add dried herbs like thyme or rosemary. Dry brining with salt 24 hours before cooking enhances flavors and moisture.
How do I know when my beef tenderloin is perfectly cooked?
Use a meat thermometer to check the internal temperature. For medium-rare, aim for 130-135°F before resting. The temperature will rise 5-10 degrees during resting.
Different doneness levels include:
– Rare: 125°F
– Medium-Rare: 130-135°F
– Medium: 140-145°F
– Medium-Well: 150-155°F
– Well-Done: 160°F and above
Can I reverse sear beef tenderloin on a grill?
Yes, you can reverse sear on a grill. Use two-zone cooking. Start with indirect heat on the cooler side, then sear on the hot side. Monitor temperatures with a thermometer to avoid overcooking.
How long should I let the beef tenderloin rest after cooking?
Let the beef tenderloin rest for 10-15 minutes. This allows juices to redistribute, making it more tender and juicy. Tent it loosely with foil to keep it warm, but avoid tight wrapping to prevent steaming.